前集回顾
Salient Object Detect 显著物体检测(SOD)
深入研究 LowPoly 图像风格化的话题之后,不可避免地接触到 SOD 这个领域。SOD 是图像处理领域非常基础的方向,学界研究热度一直很高。Saliency Detection 或者说 Salient Object Detection,显著物体检测,其目标是模拟人类的视觉系统,从图像中检测提取最吸引人的像素集或者区域。在图像处理的很多应用领域中,SOD 都是关键处理步骤,譬如前景提取、图像分类、图像/视频分割、目标检测/识别等。
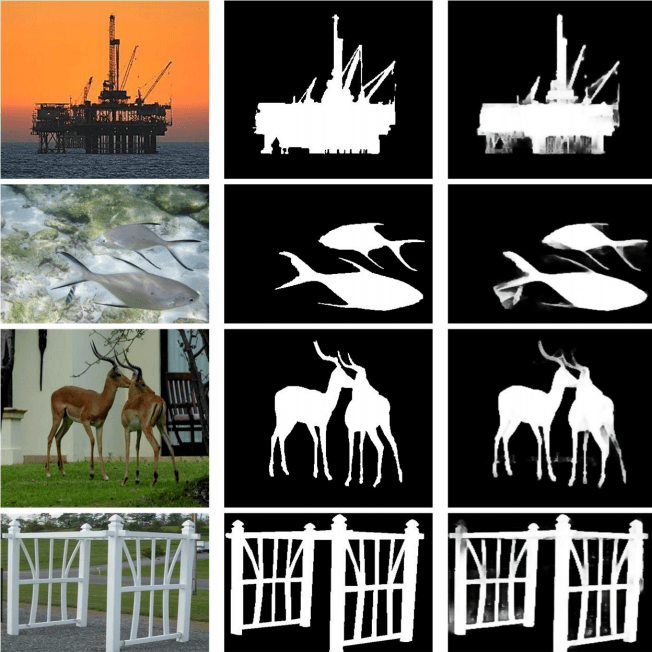
某篇论文里对于 SOD 效果的配图。左图是原始图,中图是人工标注的真实结果(ground true),右图是算法提取的结果
实际挖掘领域论文的情况来看,多媒体的资源越来越多,需要有效提取图片或者视频帧关键信息的场合也就显得越来越重要。SOD 也可以作为图片或者视频预处理的一部分,为后续例如人脸识别等任务提前做好性能优化。因此这个领域在 CV 学界炙手可热。甚至有一篇综论类的论文,专门做了目前为止流行算法的 benchmark:https://github.com/DengPingFan/SODBenchmark。
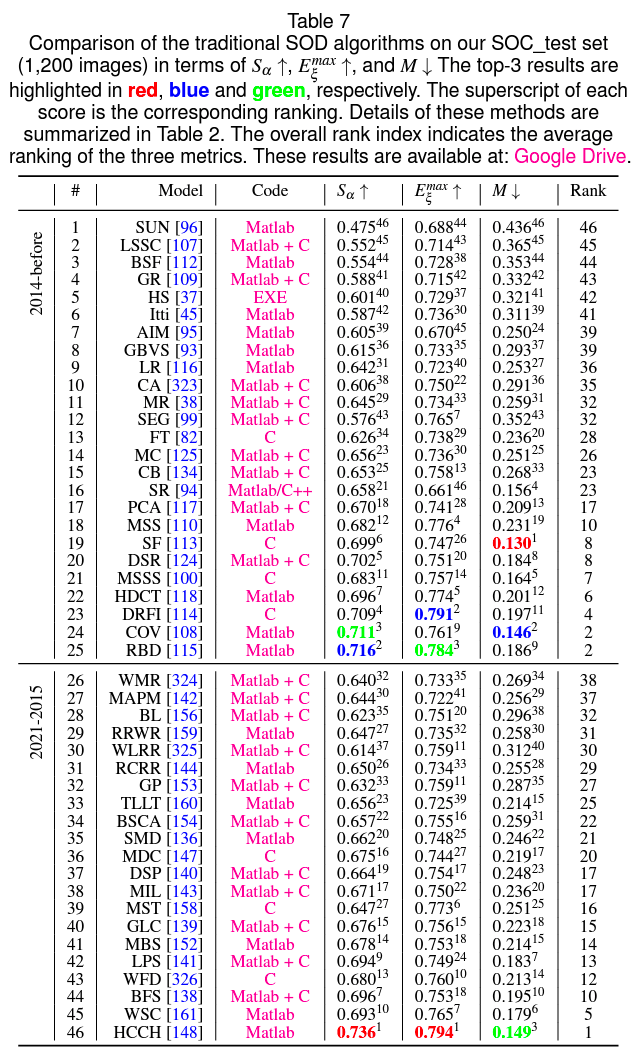
从这篇综述看,目前这个领域基本有两大阵营,一方是传统方法做 SOD,另一方是 Deep Learning。传统方法就是基于图片本身的各种信息,纯信息处理的方式提取 Saliency:
而 Deep Learning 的方法则是采用各种场景的人工标注过的测试训练集做预训练,得到的模型再对新的图片进行 Saliency 识别。
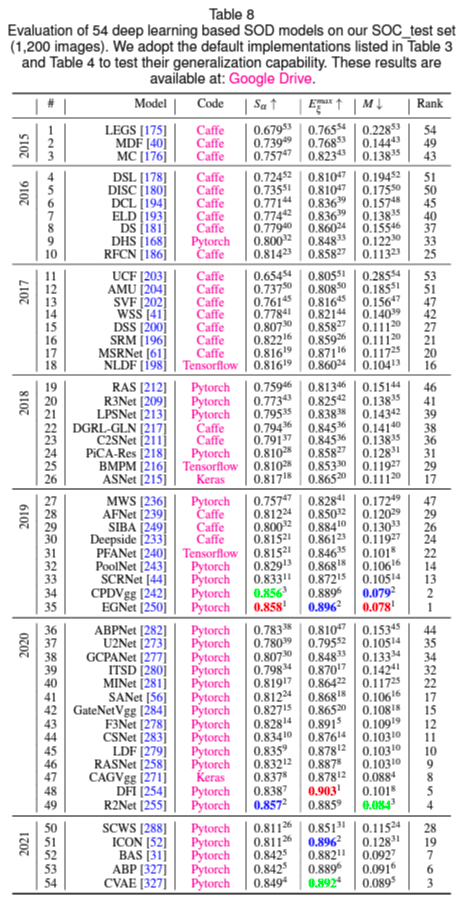
可以看到,15 年往后,单纯从最终识别效果来看,Deep Learning 的方法就开始慢慢超越传统方法,并且 19 年往后大大拉开了差距。问题在于传统算法的性能极限极高,头部的算法相比 Deep Learning 算法有几十倍、上百倍的优势,在计算资源有限、对性能敏感的场景下,传统方法依然是主流。只是从研究团体规模来看,做传统方向算法研究的人越来越少,现在已经是少数群体了。
不过回到实操层面,在 Web 下做 SOD 这件事,只能选择传统方式做。因为用户要处理的图片主题、场景是不确定的,要生成足以应对通用场景的模型,训练量太大,最终模型的体积对前端 toC 应用而言,目前是不可接受的。但哪怕是选择传统方式,目前社区也基本无可用资源。OpenCV 项目本身,Saliency 相关的模块在算法包以及 ximgproc 包里,这两个包几乎没有做过 WebAssembly 的兼容和构建。另外,传统方向效果比较好的算法,通常都有比较强的平台依赖性或者硬件依赖性,譬如有些必须运行在 Matlab 环境,有些依赖 Coda GPU 计算框架,有的干脆就全程使用 GPU 运算,没有办法满足 Web 使用环境的要求。这些方法,哪怕跑通了 WebAssembly 构建的流程,最终也是无法使用的。
所以这个方向上的结论目前是这样的,它对于最终 LowPoly 生成效果的影响主要是辅助类的,就是提取出来 Saliency 之后,我们可以对 Saliency 做更强的点采样,对非 Saliency 区域做模糊化或者干脆就不做 LowPoly 处理。这个能力对于未来这个方向上做进一步的风格化是很有用的,但对通用场景的 LowPoly 优先级还不够高。
探索这个方向的收获有两个,一个是大概看懂了 gai2015 博士论文中取点区别对待的方式,另一个是通过研读论文,从一个关联领域里得知两个影响更为深远的重要技巧:如何尽可能减少尖锐角三角形,以及如何更合理地取色。这个关联领域就是 SuperPixel 超像素。
《50 FPS Object-Level Saliency Detection via Maximally Stable Region huang2019》
基于 SuperPixel 超像素实现高性能精准 SOD 的算法。不过这篇论文最后没有去实现,因为对前端来说整个算法流程代价太大了。C++ 可以做到 50FPS,但跑在浏览器里光是 SuperPixel 生成的开销就已经接近这个数值
SuperPixel 超像素
SuperPixel 超像素是一种 image segmentation 图像分割的方法。这也是一个超级热门的 CV 领域。17 年也有一篇经典的综述论文,描述总结领域先进的超像素生成方法,并建立评估体系做这些方法的 benchmark。总体来说,超像素就是把以规则 1px 像素构成的图片,抽象成由“超像素”构成的图片,所谓超像素就是一组普通像素的集合,在后续的图像处理里,这一组普通像素都可以作为一个整体去处理。这个处理显著降低图片的“像素数量”,并且很大程度保留了原图的轮廓和色彩信息。为后续处理带来很大的便利,所以是一种特别特别基础,特别特别关键的算法。
![]()
MBS 论文的配图。可以直观地看一下超像素算法做的事情
《Superpixels- An Evaluation of the State-of-the-Art》
这个领域和 SOD 一样,目前学界也有两个方向,传统算法方向和 Deep Learning 的方向。但两者在最终处理结果上的差异并不大,甚至这个领域有个很有意思的现象,就是 2011 年的一个经典论文 SLIC,它提出的方法至今仍然是绝大部分经典算法遵从的架构,也是大部分后述经典算法、Deep Learning 算法的某一步处理。
也和 SOD 一样,Deep Learning 的方法对实时交互要求高的 Web 场景基本没有实践的意义和价值,而传统方法绝大部分会受到计算平台和硬件的限制,而 SLIC 是这个领域绕不开的,所以我们先直接在前端实现这个算法吧:
《SLIC Superpixels Compared to State-of-the-art Superpixel Methods》
SLIC 全称 Simple Linear Iterative Clustering,就是“简单的线性迭代聚类算法”。它的显著特点就是性能好,流程设计简单易扩展。目前它也是在这个领域被应用最多、引用数目最大、扩展最广泛的算法。
算法流程:
/∗ Initialization ∗/
Initialize cluster centers Ck = [lk, ak, bk, xk, yk]T by
sampling pixels at regular grid steps S.
Move cluster centers to the lowest gradient position in a
3×3 neighborhood.
Set label l(i) = −1 for each pixel i.
Set distance d(i) = ∞ for each pixel i.
repeat
  /∗ Assignment ∗/
  for each cluster center Ck do
    for each pixel i in a 2S ×2S region around Ck do
      Compute the distance D between Ck and i.
      if D < d(i) then
        set d(i) = D
        set l(i) = k
      end if
    end for
  end for
  /∗ Update ∗/
  Compute new cluster centers.
  Compute residual error E.
until E ≤threshold
就是一个非常经典的聚类算法流程,初始化的时候根据用户期望的中心点数量(或者抽样取点间隔),初始化一批“中心点”出来,然后计算像素点与初始化中心点、相邻中心点的距离(这个距离的定义非常关键,关系到聚类往哪里聚合的核心逻辑),如果当前像素点与另一个中心点距离更接近,则更新所属聚类。完成一次迭代之后,会更新中心点(通过寻找聚类中的距离最小值),之后进入下一次迭代。这个过程持续到中心点不再发生变化或者已经达到迭代次数上限。
与中心点的距离定义关系到“图片会被怎样分割”,是整个算法的核心,也是计算量最大的、需要花最多精力优化的地方。SLIC 把距离分成两种,一种是空间距离,就是像素点的 x、y 坐标计算的距离,另一个是色彩空间距离,为了最终结果在视觉上更符合直觉,它选用的是 LAB 色彩通道。最终的距离就是这两个距离加权之后的结果:
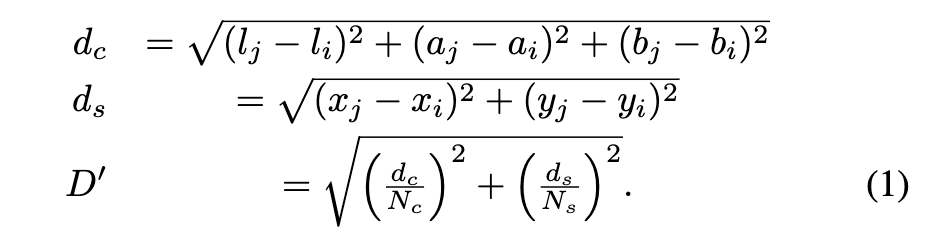
其中,加权参数 Nc 和 Ns 分别是一个聚类内部的最大距离(色彩空间距离、空间距离)。JS 实现的时候。我们定义一个描述计算过程框架的基础类,然后 SLIC 类继承基础类后定义自己的距离计算逻辑、聚类更新流程逻辑即可(为后续更方便地实现统一思路的 SNIC 等算法)。
ClusteringSuperPixels.js
// the base class for superpixel algorithms
// TODO: generating polygons @reference: [pySNIC](https://github.com/MoritzWillig/pysnic)
const rgb2lab = require('../../share/color/rgb2lab');
const lab2rgb = require('../../share/color/lab2rgb');

class ClusteringSuperpixels {
  constructor(mat, step = 20, m = 25/* [1, 40] */, iters = 15) {
    // source Mat
    step = Math.round(step);
    m = Math.round(m);
    this.rgbMat = mat; // RGB
    const { cols, rows } = mat;
    // console.log(`image size: ${cols} x ${rows}`);
    this.width = cols;
    this.height = rows;
    this.size = cols * rows;
    // CIELab Mat
    this.labArray = Array(rows).fill().map(() => Array(cols).fill([]));
    this._rgb2lab(); // NOTICE this is much faster than cv.cvtColor
    // clustering parameters
    this.step = step; // center sampling step, for k-means iterates, k is loosely (with * height / step)
    this.m = m; // the constant m, for adjusting influence of LAB weight and xy weight, check the paper for details
    this.m_2 = m * m;
    this.compactness = m;
    this.step_2 = step * step;
    this.iters = iters;
  }

  computeContours() {
    const {
      height,
      width,
      clusters,
    } = this;
    const dx8 = [-1, -1, 0, 1, 1, 1, 0, -1];
    const dy8 = [0, -1, -1, -1, 0, 1, 1, 1];
    const contours = [];
    const isTaken = Array(height).fill().map(() => Array(width).fill(false));

    // contours
    for (let i = 0; i < height; i++) {
      for (let j = 0; j < width; j++) {
        let nr_p = 0;
        // Compare the pixel to its 8 neighbors
        for (let k = 0; k < 8; k++) {
          const x = j + dx8[k];
          const y = i + dy8[k];
          if (x >= 0 && x < width && y >= 0 && y < height) {
            // console.log(y, isTaken[y], clusters[y]);
            if (isTaken[y][x] === false && clusters[i][j] !== clusters[y][x]) {
              nr_p += 1;
            }
          }
        }
        // Add the pixel to the contour list if desired
        if (nr_p >= 2) {
          const p = { x: j, y: i };
          contours.push(p);
          isTaken[i][j] = true;
        }
      }
    }
    this.contours = contours;
    // console.log(`we have ${contours.length} edge points`);
  }

  _rgb2lab() {
    const {
      rgbMat,
      labArray,
      width,
      height
    } = this;
    for (let x = 0; x < width; x++) {
      for (let y = 0; y < height; y++) {
        const rgb = rgbMat.ucharPtr(y, x);
        labArray[y][x] = rgb2lab(rgb);
      }
    }
  }

  _setColor2Points(mat, points, color = [255, 255, 255]) {
    for (let i = 0; i < points.length; i++) this._setColor2Point(mat, points[i], color);
  }

  _setColor2Point(mat, point, color = [255, 255, 255]) {
    const [r, g, b] = color;
    const { x, y } = point;
    const data = mat.ucharPtr(y, x);
    data[0] = r;
    data[1] = g;
    data[2] = b;
  }

  _normalizeCenterChannels() {
    const { centers } = this;
    for (let j = 0; j < centers.length; j++) {
      const center = centers[j];
      const count = center.count;
      // eslint-disable-next-line no-continue
      if (count === 0) continue;
      // NOTICE int is much faster in this case
      // center.l = Math.round(center.l / count);
      // center.a = Math.round(center.a / count);
      // center.b = Math.round(center.b / count);
      center.l /= count;
      center.a /= count;
      center.b /= count;
      center.x = Math.round(center.x / count);
      center.y = Math.round(center.y / count);
    }
  }

  _clearCentersAndFillRGBChannels() {
    let { centers } = this;
    // removes invalid centers
    centers = centers.filter((c) => c.count);
    // get rgb colors
    centers.forEach((c) => {
      const [r, g, b] = lab2rgb([c.l, c.a, c.b]);
      c.r = r;
      c.g = g;
      c.b = b;
    });
    this.centers = centers;
  }

  _findLocalMinimum(x, y) {
    // NOTICE simplified, not totally the same as the algorithm in the paper
    let minGrad = Number.MAX_VALUE;
    const localMin = {};
    const {
      labArray
    } = this;
    for (let i = x - 1; i <= x + 1; i++) {
      for (let j = y - 1; j <= y + 1; j++) {
        const i1 = labArray[j + 1][i][0]; // bottom
        const i2 = labArray[j][i + 1][0]; // right
        const i3 = labArray[j][i][0];
        // Euclidean distance
        const min = Math.sqrt((i1 - i3) ** 2 + (i2 - i3) ** 2);
        if (min < minGrad) {
          minGrad = min;
          localMin.x = i;
          localMin.y = j;
        }
      }
    }
    return localMin;
  }

  findSeeds() {
    const {
      width,
      height,
      labArray,
      step,
    } = this;
    const centers = [];
    // Initialize cluster centers by grid step (block size)
    const widthEdge = width - 2; // for the next step counting local minimum
    const heightEdge = height - 2;
    for (let i = step; i < widthEdge; i += step) {
      for (let j = step; j < heightEdge; j += step) {
        const center = this._findLocalMinimum(i, j);
        const color = labArray[center.y][center.x];
        center.l = color[0];
        center.a = color[1];
        center.b = color[2];
        centers.push(center);
      }
    }
    return centers;
  }

  getCenter(x, y) {
    const centerId = this.clusters[y][x];
    const center = this.centers[centerId];
    return center;
  }

  drawCenters(mat, color = [255, 0, 0]) {
    if (!mat) mat = new cv.Mat(this.height, this.width, cv.CV_8UC3, new cv.Scalar(0, 0, 0));
    this._setColor2Points(mat, this.centers, color);
    return mat;
  }

  drawContours(mat, color = [0, 255, 0]) {
    if (!mat) mat = new cv.Mat(this.height, this.width, cv.CV_8UC3, new cv.Scalar(0, 0, 0));
    if (!this.contours) this.computeContours();
    this._setColor2Points(mat, this.contours, color);
    return mat;
  }

  drawSuperPixels(mat) {
    if (!mat) mat = new cv.Mat(this.height, this.width, cv.CV_8UC3, new cv.Scalar(0, 0, 0));
    const { width, height } = this;
    for (let x = 0; x < width; x++) {
      for (let y = 0; y < height; y++) {
        const center = this.getCenter(x, y);
        // FIXME if there are error points, code below will throw an error
        if (center) this._setColor2Point(mat, { x, y }, [center.r, center.g, center.b]);
      }
    }
    return mat;
  }
}

module.exports = ClusteringSuperpixels;
SLIC.js
/*
* from paper:
* SLIC Superpixels Compared to State-of-the-art Superpixel Methods 2011
*/
const ClusteringSuperpixels = require('./ClusteringSuperPixels');

class SLIC extends ClusteringSuperpixels {
  computeDist(centerId, pixX, pixY) {
    // NOTICE not the same as the original paper, mainly cancels Math.sqrt() calls for better performance
    const center = this.centers[centerId];
    const color = this.labArray[pixY][pixX];
    // lab distance
    const dl = center.l - color[0];
    const da = center.a - color[1];
    const db = center.b - color[2];
    // NOTICE (x * x) is much faster than Math.pow(x, 2) and (x ** 2)
    const dc = dl * dl + da * da + db * db;
    // xy distance
    const dx = center.x - pixX;
    const dy = center.y - pixY;
    const ds = dx * dx + dy * dy;
    return dc + (ds / this.step_2) * this.m_2;
  }

  generateSuperpixels() {
    const {
      width,
      height,
      labArray,
      step,
    } = this;
    // k-means clustering
    // console.time('new2DArray');
    this.clusters = Array(height).fill().map(() => Array(width).fill(-1)); // 2D
    // distances is initialized before each iteration
    this.distances = Array(height).fill().map(() => Array(width));
    // NOTICE multiple small size arrays perform better than a single large array
    // console.timeEnd('new2DArray');
    // console.time('new1DArray');
    // this.clusterId1D = Array(this.height * this.width).fill(-1);
    // console.timeEnd('new1DArray');
    this.centers = this.findSeeds();

    const { clusters, distances } = this;

    // iterations
    for (let i = 0; i < this.iters; i++) {
      const { centers } = this;
      // initialize distances
      distances.forEach((arr) => arr.fill(Number.MAX_VALUE));
      for (let j = 0; j < centers.length; j++) {
        // FIXME only compares to pixels in a 2 x step by 2 x step region
        for (let k = centers[j].x - step; k < centers[j].x + step; k++) {
          for (let l = centers[j].y - step; l < centers[j].y + step; l++) {
            if (k >= 0 && k < width && l >= 0 && l < height) {
              const d = this.computeDist(j, k, l);
              // Update cluster allocation if the cluster minimizes the distance
              if (d <= distances[l][k]) {
                distances[l][k] = d;
                clusters[l][k] = j;
              }
            }
          }
        }
      }
      // Clear the center values
      for (let j = 0; j < centers.length; j++) {
        const center = centers[j];
        center.l = 0;
        center.a = 0;
        center.b = 0;
        center.x = 0;
        center.y = 0;
        center.count = 0;
      }
      // Compute new cluster centers
      for (let j = 0; j < width; j++) {
        for (let k = 0; k < height; k++) {
          const cId = clusters[k][j];
          const center = centers[cId];
          if (center) {
            const color = labArray[k][j];
            center.l += color[0];
            center.a += color[1];
            center.b += color[2];
            center.x += j;
            center.y += k;
            center.count += 1;
          }
        }
      }
      // normalize the clusters
      this._normalizeCenterChannels();
    }
    this._clearCentersAndFillRGBChannels();
    // console.log(`we have ${this.centers.length} superpixels`);
  }
}

module.exports = SLIC;
这确实是相当强大又简单的算法,加上杂七杂八的计算边界曲线、辅助 debug 输出图形的函数,总体才区区 300 行代码。是相当值得研究和实践的算法。还有个比较神奇的点,我实现了同一个实验室出版的优化版本的 SNIC 算法,但出来的结果从视觉上我觉得还比不上 11 年这篇论文的算法。
![]()
超像素中心点、边沿
![]()
超像素统一着色结果
LowPoly 风格化新思路
探究完 SuperPixels 算法之后,LowPoly 算法的结果上了一个新的台阶。显著的提升在于两个点:一是前景、背景的空白区域取点。聚类完了之后,中心点就是非常好的取点对象;另一个点是着色,生成三角形之后,当前三角形应该着什么色?应该是三个顶点加上中心点加权平均的结果,这样的结果好于之前实践的所有策略,并且不同场景的图可以按需调整权重,从而达成不同的结果。
LowPoly 从比较抽象的层面来思考本质,整个过程其实比较接近“超像素”。超像素的作用,其实也可以总结为“尽可能保留图片视觉信息的同时,降低精度”。LowPoly 的任务也是类似的。不能破坏原图的视觉传达,但换用大块的“三角形”替代原始像素。从这个层面看,超像素对 LowPoly 的作用不仅是辅助取点,算法思路上也可以多加借鉴。
综合 LowPoly 领域本身的情况和在 Web 上的限制,最核心的步骤其实是这些:
- 输入原图,归一化为标准尺寸图像(譬如最大宽度 1024)
- 边沿检测 + 线条关键点抽样
- 超像素生成 + 中心点抽样
- 人脸识别 + 特征点抽样
- 三角化
- 根据原图及关键点 + 中心点所处超像素的颜色值取样着色
- 输出矢量图结果
原始图像

边沿检测 + 线条关键点抽样
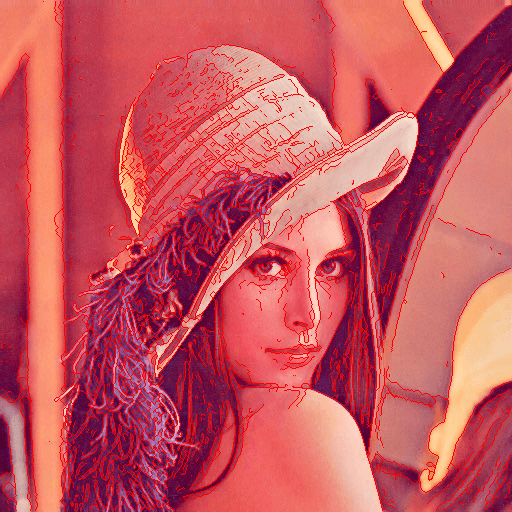
超像素生成 + 中心点抽样
![]()
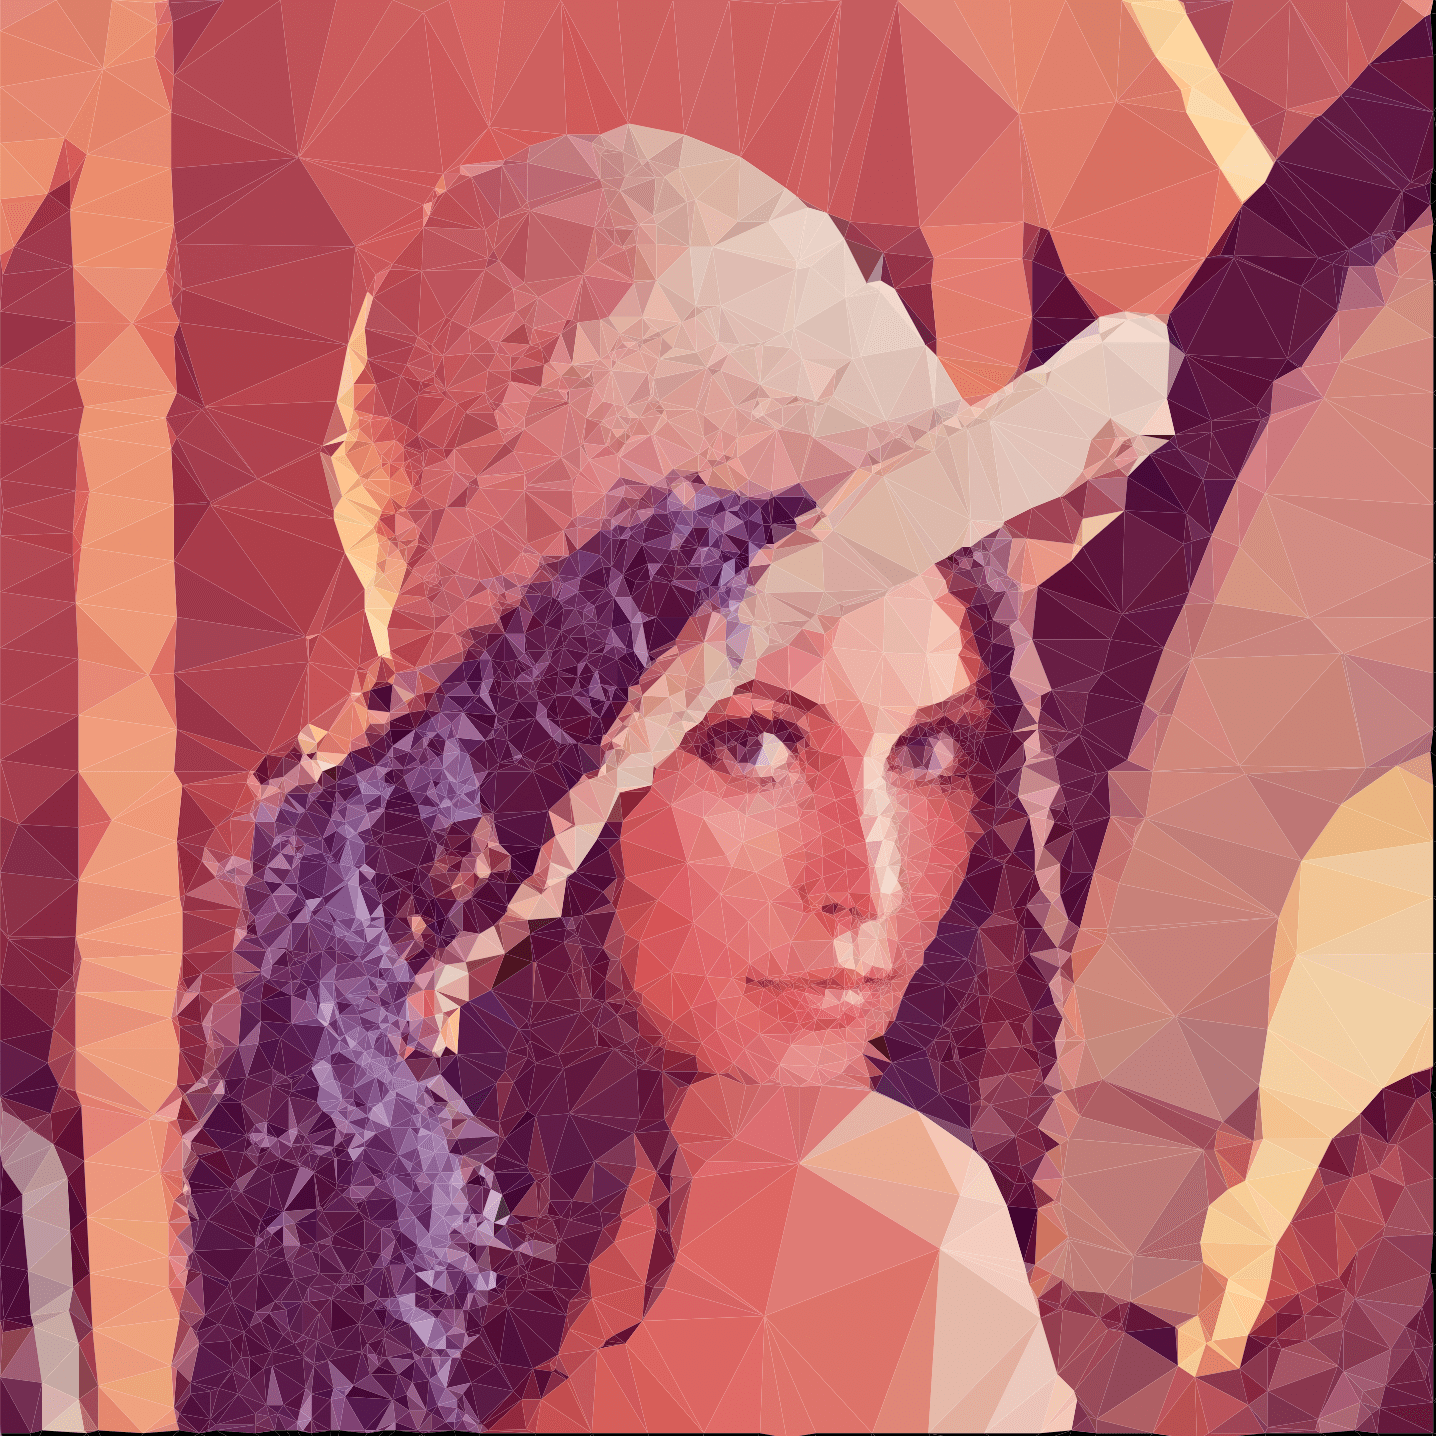
超像素颜色取样
![]()
确定三角化顶点

着色完成

这个做 LowPoly 风格化的思路框架基本已经是目前在 Web 技术下的极限了,更细致的效果可以在不同的步骤做扩展,但应用这套思路基本可以保证输出与 gai2015 不相上下,甚至更优的结果。并且在 Web 环境下实现了比 gai2015 原生算法更快的结果。归根到底,对应用场景涉及的技术,深挖到了非常基础的层面之后,LowPoly 这件事变得不再感性,不再像看起来那么复杂。“组合这些基础能力就能得出比它更好的结果”,这几乎是下意识就能得出的结论。
优化前版本
优化后版本
后续方向
正儿八经版:
- 轮廓锐化 thinning algorithm / skeletonize
- 从超像素聚类边界提取连续轮廓边 from superpixels to continuous edges
- 材质纹理和图案支持 textures / patterns styling 2018
- 肢体细节还原(五官、手指等)detail body part enhancement
- 开放各流程配置项,可以组合得出更多风格化效果
- 优化各流程算法本身,目标是性能更优效果更好
天马行空版:
- Web 技术下的“IPPaaS”,让不同的 CV 算子可以自由配置组合
- 或者结合 RPA,构成带自动化执行能力的 CV 流水线
- etc.