引言
树可以说是最常用的数据结构之一。对前端、web 前端可视化而言尤其如此。每天打交道的 DOM 是树结构的,绘图时的 SVG 是树结构的,即便用的是 canvas,图层结构、图形拾取等也会用到树结构。甚至我们写的代码,编译时也会解释成 AST 语法树。
树结构的应用场景如此多样,很多时候我们希望能把树结构用一种直观的、可以从视觉上快速定位树节点的办法进行可视化,亦即所谓的树布局。树布局算法是一个有着悠长历史的话题,甚至早在 1714 年就能找到相关的论文了(参见 http://treevis.net/),也有非常多的方向,二维的三维的,直角坐标系的极坐标系的,基于分形的,基于空间分割的,基于节点连线的等等。本文讨论的是在二维平面、直角坐标系下,用节点和连线的方式可视化树结构的布局算法。
输入输出
Tree T 数据结构抽象为以下这种递归的定义形式:
const treeNode = {
  label: 'root',
  children: [
    // other tree nodes
  ]
}
每一个 tree node 都是树上的一个节点,可能是根节点,可能是枝干节点,也可能是叶子节点。最终我们要为每一个 tree node 附上一个二维平面上的 (x, y) 坐标,以标示这个节点在画布上的位置。
算法类型
即便加上了“二维平面”、“直角坐标系”和“节点连线形式”这样的限制,树布局算法仍然有不少类型。按照学术上的沿革,大体有以下几种:分层/非分层布局、紧凑/非紧凑布局、其他特殊布局。
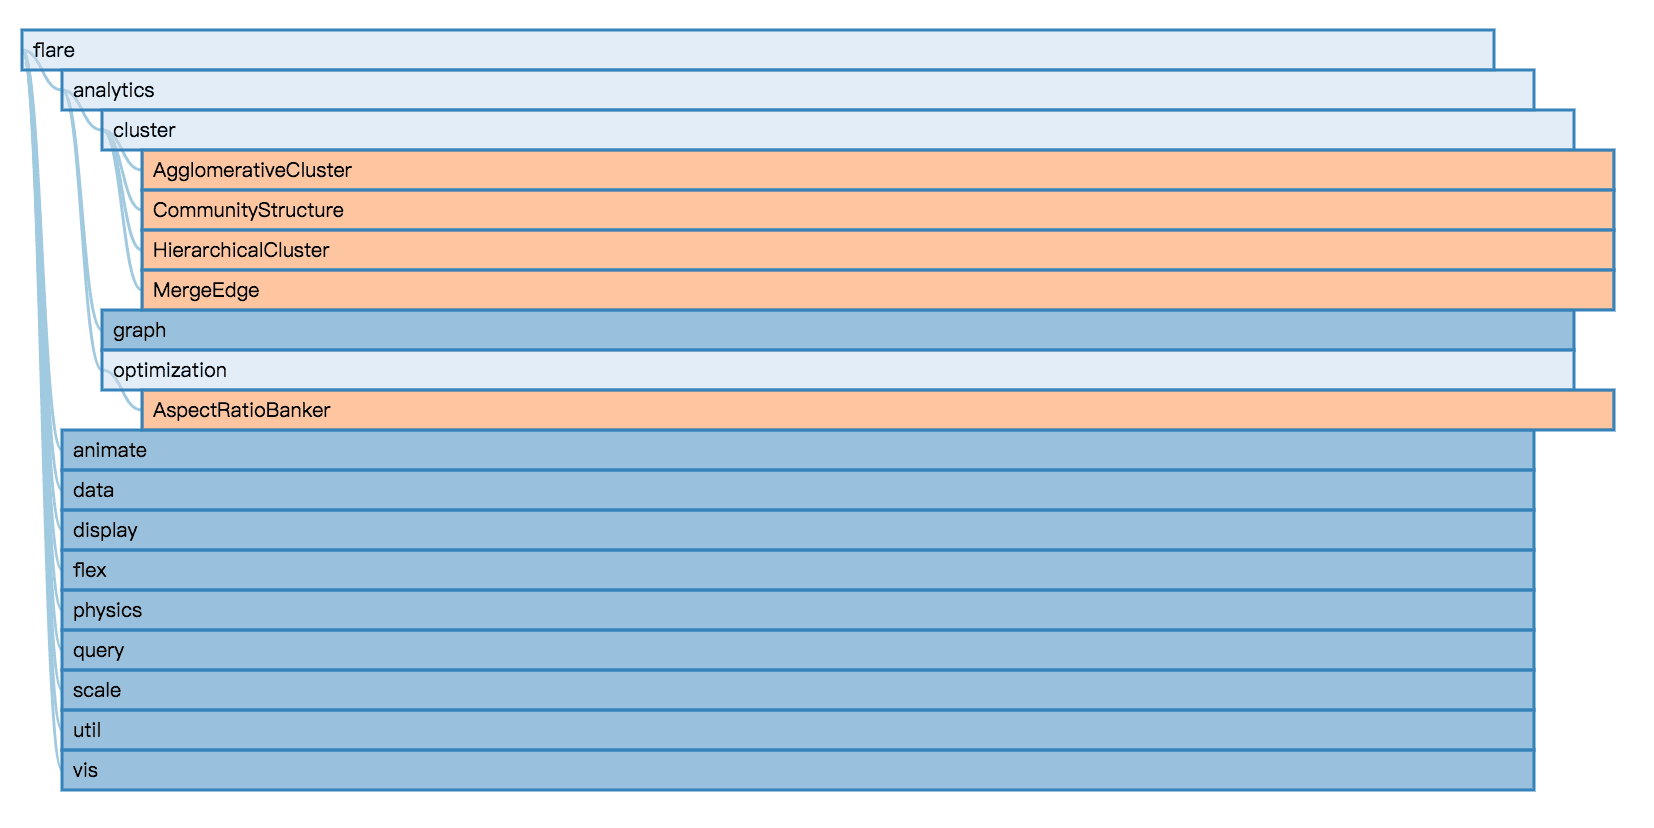
其中,分层布局(layered)一般是考虑某一个维度的分层,譬如操作系统的文件夹目录的展示,就是一种典型的分层布局(缩进树布局)。这种布局顾名思义,使用缩进量来表示层级,因而可以从节点的空间分布很明显地看到某个树节点处于哪一个层级。
缩进树布局示例(d3: Collapsible Indented Tree)
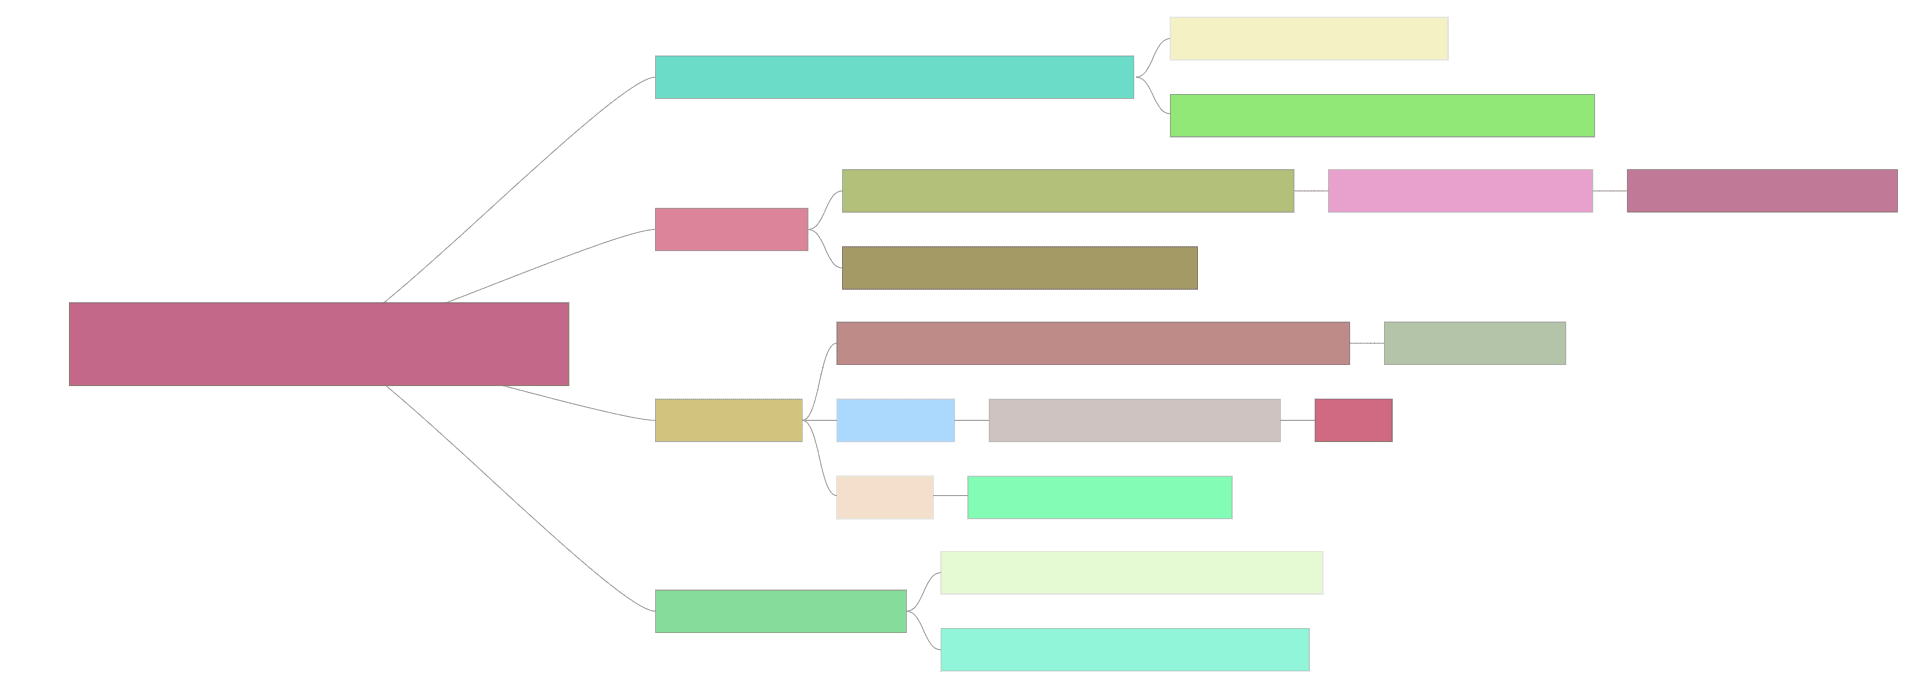
非分层布局(non-layered)能清晰地看到节点的上下级,但不同分支的树节点之间的深度大小没办法一下子对比出来。这种布局方式通常是为了更高效地利用画布空间,通常会比分层布局更紧凑、也相对更美观。
非分层的紧凑树布局

紧凑和非紧凑布局是从另一个维度对树布局算法的分类。举个例子,著名脑图软件 XMind 上的默认布局从严格意义上说,是不紧凑的。它每一个子树分支往 x 轴无限延伸下去,一定不会和其他分支重合,也就是在 y 轴上有非常大的空隙,不够紧凑。
XMind 上的树布局是非分层、非紧凑的(一个极端的例子)

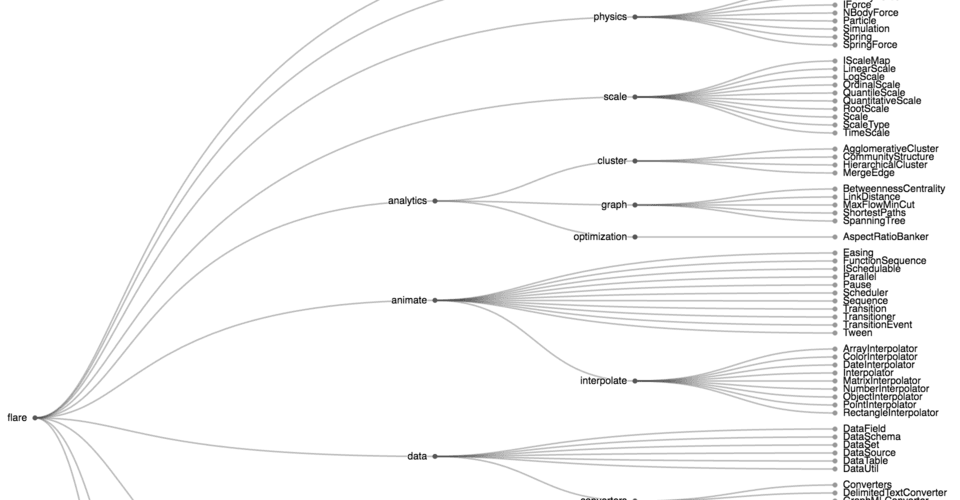
最后所谓其他的特殊布局方式,就是某些特殊场景下对树布局有特殊限定条件的可视化,譬如“生态树布局”,还有基于分形的树布局等。
生态树(dendrogram)布局实例
算法实例
所有树布局算法都需要涉及一些基础的操作,譬如从原始数据里获取树节点的包围盒(BoundingBox)、自上而下遍历节点、自下而上遍历节点等等。开始实现树布局算法之前,我们有必要抽象出一个统一的 TreeNode 类,封装这些通用的实例方法等。并且提供一个方法从原始数据转换得到一个 TreeNode。
TreeNode 类和转换方法示例代码
class TreeNode {
  constructor(data, options) {
    this.data = data; // stores the orginal data
	// gets id, width, height, depth, x, y, children, etc.
  }
  isRoot(){}
  isLeaf(){}
  eachNode(callback){} // 可以是简单的递归实现
  DFTraverse(callback){} // 利用堆栈实现深度优先遍历
  BFTraverse(callback){} // 利用队列实现广度优先遍历
  getBoundingBox(){}
  translate(){}
  right2left(){} // 往右布局的树做 x 轴的镜像翻转
  bottom2top(){} // 向下布局的树做 y 轴的镜像翻转
}
function hierarchy(data, options, isolated) {
  const root = new TreeNode(data, options);
  const nodes = [ root ];
  let node;
  if (!isolated) {
    while (node = nodes.pop()) {
      const children = options.getChildren(node.data);
	  for (let i = 0; i < children.length; i ++) {
        const child = new TreeNode(children[i], options);
	    node.children.push(child);
	    child.parent = node;
	    child.depth = node.depth + 1;
	  }
    }
  }
}
这样我们有了从原始数据得到的 TreeNode 类。这个类的属性只与布局相关(宽高、坐标等等),同时有了深度优先遍历、广度优先遍历等基础能力。有了这样的基础设施,二维平面直角坐标系下的大部分布局算法都可以很简单地实现了。
缩进树布局
从上文提到过的典型缩进树(操作系统文件夹结构)来看,缩进树的特点是用“缩进量”来表示层级的一种布局方式,并且“缩进量”仅针对某一维度(譬如横坐标)。从上面得到的 TreeNode 实例,树节点的层级深度已经在转换过程中确定,因此这个布局就非常直观了。
function indentedLayout(roo, indent) {
  let previousNode = null;
  root.DFTraverse(node => {
    node.x += indent * node.depth;
	  node.y = previousNode ? previousNode.y + previousNode.height : 0;
	  previousNode = node;
  });
}
总体思路一句话就可以概括:对树进行深度优先遍历,节点的 x 坐标由缩进量和节点深度决定,y 坐标则是上一节点的 y 加上高度 height。
XMind 脑图的布局
大家可能对 XMind 软件里的脑图布局比较感兴趣。事实上这是一个相当简单的布局(不知道为啥 XMind 的实现效率似乎不高)。XMind 脑图的布局也是典型的树布局,它这种布局的特点是:
- 左右对称
- 树节点在横坐标方向延伸,某个子树分支往后无限延伸都不会和平行的子树分支重合
首先解决左右对称的问题。上述转换方法 hierarchy 中有个 isolated 方法,如果设置成 true,则只会生成一个独立的树节点,不会有子节点。我们可以在初始化的时候生成两棵树:左边的所有子树和一个独立的 rootNode 构成左树;右边的所有子树和一个独立的 rootNode 构成右树。两棵树都用水平往右的布局方法布局,布局完之后左树做水平方向的镜像翻转,之后用 translate 确保两棵树的 rootNode 位置一致,最后合并为一棵树,就是最终的布局效果。
整体的思路有了,通过这个思路把问题拆解成了一个:XMind 脑图右半边是怎么布局的?说起来也简单,首先 x 坐标可以通过节点宽度简单迭代计算得到。计算 y 坐标稍微复杂一点,需要做两次遍历,第一次计算各个子树分支总体占的高度;第二次分离各个子树,完成最终布局。说白了总共三次遍历,仍然是线性时间复杂度,是相当简单的算法。下面是伪代码。
function xmindLayout(data, options) {
  const {left, right} = separateRoot(data, options); // 分离左右子树
  nonLayeredUntidyLayout(left);
  nonLayeredUntidyLayout(right);
  left.right2left();
  const root = combineSubTrees(left, right);
  // 思路:left 的根节点调用 translate 使得坐标和 right 的根节点一致
  return root;
}

function separateRoot(data, options) { // 分离左右树
  const left = new TreeNode(data, options, true);
  const right = new TreeNode(data, options, true);
  const root = new TreeNode(data, options);
  for (let child in root.children) {
    const side = options.getSide(child.data);
	if (side === 'left') left.children.push(child);
	if (side === 'right') right.children.push(child);
  }
  return {left, right};
}

function calcTotalHeight(node) { // 统计子树 y 轴占高
  if (node.isLeaf()) return node.totalHeight = node.height;
  let totalHeight = 0;
  node.children.forEach(c => { totalHeight += calcTotalHeight(c); });
  return node.totalHeight = Math.max(node.height, totalHeight);
}

function nonLayeredUntidyLayout(root) { // 非分层非紧凑树布局(水平向右)
  // first walk: x
  root.BFTraverse(node => {
    node.x = node.parent.x + node.parent.width;
  });
  // y
  // second walk
  calcTotalHeight(root);
  // third walk: 根据子树 y 轴占高(totalHeight)分配 y 坐标,逻辑和缩进树类似,不再赘述
  separateSubTreeYCoord(root);
}
20180428 更新:XMind 的布局事实上向前走了一步。上述算法布局出来,某个父节点的 y 坐标是由它所有子节点的整棵子树包围盒高度取中心点得到的,从整体来看是绝对对称的。而 XMind 也许出于美观的考虑,y 坐标取的是子节点节点本身的包围盒高度来计算,从而使得局部看起来更加的对称。要做到这一点,只需要再加一次遍历即可:
示例代码
function adjustAncestor(node) {
  if (node.isLeaf()) return;
  node.children.forEach(adjustAncestor);
  node.y = (node.children[0].y + node.children[node.children.length - 1].y) / 2
}
线性时间复杂度的非分层紧凑盒树布局
相对而言,在这个场景下最复杂的布局是“非分层紧凑盒树布局”(non-layered compact box layout)。因为这种布局在填充空间时会考虑整个包围盒大小,上述其他布局包括下面的生态树布局严格来说都只考虑了某一个维度的情况,另一维度简单遍历就能计算出来。这种布局的算法直到 2013 年才出了一种线性时间复杂度的版本:
Drawing non-layered tidy trees in linear time 2014
这个算法的前身是著名的 Reingold-Tilford 算法和它的改进版本 Improving Walker's Algorithm to Run in Linear Time。Reingold 的算法是分层的树布局,也就是说同一深度的树节点在某个方向(譬如水平方向)的坐标是一致的。这会带来一定的“不紧凑”的结果。此后,有不少对这个算法的扩展,试图做到两个方向都紧凑的结果。不过这些扩展都是 O(n^2) 的复杂度。直到 2013 年 John Wiley 提出了这个 O(n) 复杂度的改进版。
这篇论文包含很多细节,有复杂度的证明过程,有这个算法的各种发展沿革、关联内容等,感兴趣的同学可以细读一下。这里直接给出算法过程:
// 这里以水平向右为例
function nonLayeredTidyTree(root) {
  getX(root);
  const wt = WrappedTree.fromTreeNode(root);
  firstWalk(wt);
  secondWalk(wt, 0);
}

function getX(node, d = 0) {
  // 作为紧凑布局,x 坐标是可以通过层级和节点宽度直接获取的
  node.x = d;
  d += node.width;
  node.children.forEach(child => {
    getX(child, d);
  }
}

function WrappedTree(h = 0, w = 0, x = 0, c = []) {
  const me = this;
  me.w = w; me.h = h; // size
  me.x = x; me.y = 0; // coord
  me.c = c; me.cs = c.length; // children
  me.prelim = 0; me.mod = 0; me.shift = 0; me.change = 0; // modified
  me.tl = me.tr = null; // left/right tree
  me.el = me.er = null; // extreme left/right tree
  me.msel = me.mser = 0; // modified count of extreme left/right tree
}
WrappedTree.fromTreeNode = root => {
  const children = [];
  root.children.forEach(child => {
    children.push(WrappedTree.fromTreeNode(child);
  }
  return new WrappedTree(root.height, root.width, root.x, children);
}

function firstWalk(wt) {
  // 预处理
  if (wt.cs === 0) return setExtremes(wt);
  firstWalk(wt.c[0]);
  let ih = updateIYL(bottom(wt.c[0].el), 0, null);
  for (let i = 1; i < wt.cs; ++i) {
    firstWalk(wt.c[i]);
    const min = bottom(wt.c[i].er);
    separate(wt, i, ih); // 根据轮廓分离子树
    ih = updateIYL(min, i, ih);
  }
  positionRoot(wt); // 更新子树根节点的位置
  setExtremes(wt); // 更新子树极端位置节点
}

function updateIYL(low, index, ih) {
  // 这个函数是关键,维护一个相邻子树最右侧轮廓的节点的链表
  // 这样每次移动节点的时候,可以从这个链表以 `O(1)` 复杂度获取垂直边界
  while (ih !== null && low >= ih.low) ih = ih.nxt;
  return { low, index, nxt: ih };
}

function secondWalk(wt, modsum) {
  // 根据预处理结果计算 y 坐标
  modsum += wt.mod;
  wt.y = wt.prelim + modesum;
  addChildSpacing(wt);
  for (c in t.c) secondWalk(c, modsum);
}
分离子树的原始做法其实和 XMind 的布局类似,只不过这里每次要获取子树的 y 坐标边界,用传统的办法每次要递归计算子树的右边界,性能会很差。论文里用一个链表存储所有已遍历的子树边界节点,使得这个查询从递归计算变成了从对象属性直接获取,使得最终性能达到理想的线性复杂度。这是一个非常典型的用空间换时间的算法范例。
生态树布局
生态树布局最大的特点是叶子节点布局在同一层,其他枝干节点按照根节点和叶子节点之间的距离和层级均匀布局。
function WrappedTree(tn, h = 0, c = []) {
  const me = this;
  me.x = me.y = 0;
  me.lc = me.rc = null;
  me.h = h;
  me.c = c;
  me.isLeaf = tn.isLeaf();
}

function dendrogramLayout(root, options) {
  const wt = WrappedTree.fromTreeNode(root); // 类似上一个算法
  getDrawingDepth(wt);
  position(wt, options, null);
}

function getDrawingDepth(t) {
  if (t.isLeaf) {
    t.drawingDepth = MAX_DEPTH;
  } else {
    const depths = t.c.map(child => getDrawingDepth(child));
    const minChildDepth = Math.min.apply(null, depths);
    t.drawingDepth = minChildDepth - 1;
  }
  return t.drawingDepth;
}

function position(t, options, prevLeaf) {
  t.x = t.drawingDepth * options.rankSep; // 横坐标由“绘制深度”和深度间隔决定
  if (t.isLeaf) {
    t.y = 0;
    if (prevLeaf) {
      t.y = prevLeaf.y + prevLeaf.height + options.nodeSep; // 叶子节点从上而下排布
    }
    prevLeaf = t;
  } else {
    t.c.forEach(child => {
      position(child, options, prevLeaf);
    });
    t.y = (t.lc.y + t.rc.y) / 2; // 父节点纵坐标为所有子节点的纵坐标中间
  }
}
树结构数据的循环遍历
要注意的是,树形结构数据的遍历,在绝大多数场景都应该放弃递归的写法,使用深度/广度优先的循环遍历。这样可以有效地避免处理大型树结构数据时栈溢出的问题,带来更好的处理性能。树结构数据的处理一般都比较底层,越靠近底层的处理逻辑应当越精简,性能越好。
核心思路就是维护一个可变队列,每次从队列前方取出并处理节点。处理到某个节点的时候,先处理节点本身,再把节点的子节点加到队列前方(深度优先)或者后方(广度优先)。重复处理过程直到队列为空,就完成了整棵树的遍历。
示例代码:
class HierarchyNode {
  // the box model of the Node
  // https://developer.mozilla.org/en-US/docs/Web/CSS/CSS_Box_Model/Introduction_to_the_CSS_box_model
  // simplified boxing model, do not differ paddingLeft and paddingRight, etc
  x = 0;
  y = 0;
  // margin
  marginX = 0;
  marginY = 0;
  // border
  borderSize = 0;
  // padding
  paddingX = 0;
  paddingY = 0;
  // size
  width = 0;
  height = 0;

  // width === contentWidth === clientWidth - 2 * paddingX === offsetWidth - 2 * borderSize === outerWidth - 2 * marginX
  get contentHeight() { return this.height; }
  get contentWidth() { return this.width; }
  get clientHeight() { return this.height + 2 * this.paddingY; }
  get clientWidth() { return this.width + 2 * this.paddingX; }
  get offsetHeight() { return this.clientHeight + 2 * this.borderSize; }
  get offsetWidth() { return this.clientWidth + 2 * this.borderSize; }
  get outerHeight() { return this.offsetHeight + 2 * this.marginY; }
  get outerWidth() { return this.offsetWidth + 2 * this.marginX; }

  get maxX() { return this.x + this.offsetWidth; }
  get maxY() { return this.x + this.offsetHeight; }

  get size() {
    let count = 0;
    this.eachNode(() => { count += 1; });
    return count;
  }

  get depth() {
    if (!this.parent) {
      return 0;
    }
    return this.parent.depth + 1;
  }

  // logical structure of the tree node
  parent = null;
  children = [];
  id = '';
  label = '';

  #data = null;
  #options = null;
  get data() { return this.#data; } // read only
  get options() { return this.#options; } // read only

  get isRoot() { return this.depth === 0; }
  get isLeaf() { return this.children.length === 0; }

  constructor(data, _options, isolated = false) {
    // override properties, methods, etc.
    // notice that if the method uses context(this), it might fail
    /* eslint-disable-next-line no-constructor-return */
    if (data instanceof Node) return data;
    this.#data = data; // storing data
    const options = mix({}, DEFAULT_OPTIONS, _options);
    this.#options = options;
    this.id = options.getId(data);
    this.label = options.getLabel(data);
    this.x = options.getX(data);
    this.y = options.getY(data);
    this.height = options.getHeight(data);
    this.width = options.getWidth(data);
    this.marginX = options.getMarginX(data);
    this.marginY = options.getMarginY(data);
    this.paddingX = options.getPaddingX(data);
    this.paddingY = options.getPaddingY(data);
    this.borderSize = options.getBorderSize(data);
    // children initializing
    if (!isolated) {
      const nodes = [this];
      let current;
      while (nodes.length) {
        current = nodes.shift();
        const childrenData = current.options.getChildren(current.data);
        const length = isArray(childrenData) ? childrenData.length : 0;
        if (childrenData && length) {
          for (let i = 0; i < length; i++) {
            const child = new Node(childrenData[i], options);
            current.children[i] = child;
            nodes.push(child);
            child.parent = current;
          }
        }
      }
    }
  }

  clone() { return new Node(this.data, this.options); }

  eachNode(callback) {
    // chainable
    // Depth First Traverse
    let nodes = [this];
    let current;
    while (nodes.length) {
      current = nodes.shift();
      callback(current);
      nodes = current.children.concat(nodes);
    }
    return this;
  }

  breadthFirstTraverse(callback) {
    // chainable
    let nodes = [this];
    let current;
    while (nodes.length) {
      current = nodes.shift();
      callback(current);
      nodes = nodes.concat(current.children);
    }
    return this;
  }

  getBoundingRect() {
    // Bounding Rectangle for the Node itself(offset size)
    return new Rectangle(this.x, this.y, this.offsetWidth, this.offsetHeight);
  }

  getTreeBoundingRect() {
    // Bounding Rectangle for the whole tree(offset size)
    let rect = this.getBoundingRect();
    this.eachNode((node) => {
      rect = Rectangle.union(rect, node.getBoundingRect());
    });
    return rect;
  }

  translate(tx = 0, ty = 0) {
    // chainable
    this.eachNode((node) => {
      node.x += tx;
      node.y += ty;
    });
    return this;
  }

  translateTo(x, y) {
    // chainable
    const dx = x - this.x;
    const dy = y - this.y;
    return this.translate(dx, dy);
  }

  horizontalFlip() {
    // chainable
    // mirror inversion by the root
    const oldX = this.x;
    const oldY = this.y;
    this.eachNode((node) => {
      node.x = 0 - node.x - node.offsetWidth;
    });
    return this.translateTo(oldX, oldY);
  }

  verticalFlip() {
    // chainable
    // mirror inversion by the root
    const oldX = this.x;
    const oldY = this.y;
    this.eachNode((node) => {
      node.y = 0 - node.y - node.offsetHeight;
    });
    return this.translateTo(oldX, oldY);
  }
}
export default Node;
总结
本文对二维平面直角坐标系下的常见树图布局做了整理,基本上能涵括大部分常见的使用场景。因为实际可视化项目的需求,我们实现的算法超出了 d3-hierarchy.tree 的范畴(d3-hierarchy.tree 是分层紧凑布局,脑图的布局/非分层紧凑布局比它更复杂)。
上述所有算法,包括基于不同方向延伸出来的各种布局(水平向右,向左,对称;垂直向下,向上,对称等)都已实现,具体代码在 antvis/hierarchy,感兴趣的同学可以一起研究。如果要直接使用,可以通过 npm 方式引入(npm install @antv/hierarchy)或者直接使用打包后的代码:unpkg。欢迎使用,欢迎提 issue 提 PR。